Once upon a time, I was asked to teach a class on how to plant a moss hanging basket. I had about an hour’s notice and next to no supplies or experience teaching. It was a bit of a surprise, but five years of greenhouse production experience enabled me to pull it off. That was the first horticulture class I taught.
One of my first greenhouse jobs was actually watering about a thousand hanging baskets overhead with a wand every Tuesday morning. Talk about a sore arm... Nowadays I use a drip irrigation system to grow my baskets with. I mix the water-soluble fertilizer up in a 200-litre barrel. I let the pump run for about a half an hour, putting 200 L of water into 200 baskets at a frequency dictated largely by the amount of sunshine we receive and the overall greenhouse temperature.
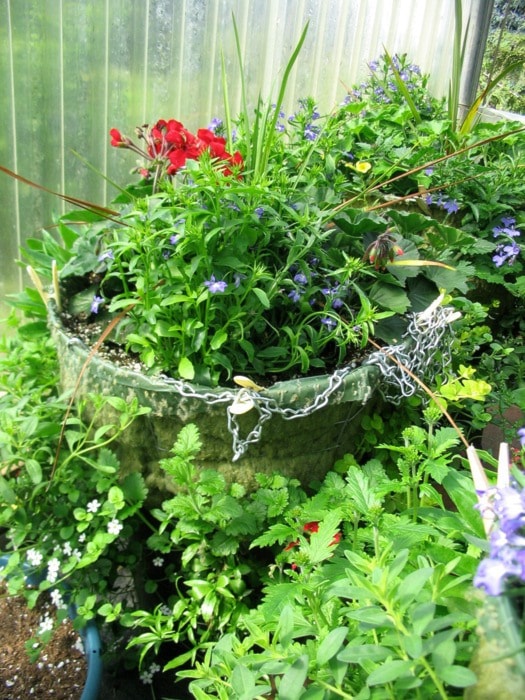
This morning I was asked exactly how to make a moss hanging basket. It’s a very good question, so I’ll answer it in detail. First, you need to gather your supplies. For a 15-inch Victorian-style moss hanging basket, you need a variety of plants (about 32 to 48 in number), some soilless growing media (perhaps a cubic foot and preferably one with a water holding gel in the mix), some moss or similar product to cover about 18 inches by four linear feet, some clothes pegs, a good-sized nursery pot to be turned upside down to hold your project in place, a wire cage, some chain and one really good hook. If your basket cage is smaller, you won’t need as many plants.
Start by setting the wire cage into the pot so that it won’t roll around. Line the wire cage with the moss, starting at the bottom. We use a product called SuperMoss, which is actually made of dyed sheep’s wool and perforated green poly. It breathes and it blends in well with the plants. It is very easy to use. Roll it out on the inside of the wire and clothes peg it to the top to hold it in place. If you decide to use real moss, start by patching it into the bottom of the cage in such a fashion that it will hold the mix. Scoop three or four inches of soil-less mix into the bottom of the pot.
Use the wire mesh in the cage like a checkerboard to place your plants into the arrangement. Start on the lower level and alternate the holes. You need to gently push the green growing parts of the basket stuffers through from the inside to the outside of the basket, leaving the roots on the inside. Make the holes in the SuperMoss as small as possible in order to avoid leaks when you water the basket. Leaks can quickly wash all the soil out of your masterpiece; however, the holes need to be large enough to pass small plants through from the inside to the out without breaking them. Hopefully the root balls of the basket stuffers are solid enough to plug the holes as you go. Place a few more handfuls of mix into the basket to firm things up.
We have all kinds of Proven Winners and Proven Selections basket stuffers here this year, about 60 kinds, including some really neat hybrid basket geraniums. There are lots of colours of calibracoa (like mini-petunias) in orange, red, blue, yellow, magenta, pink and blackberry punch — all trailing, no deadheading, so way less work.
For contrasting foliage that will spill out of the basket, incorporate variegated vinca vine, variegated plectranthus, yellow or black sweet potato vine or purple Persian shield. For a bright yellow foliage, try Goldilocks lysimachia or a heat tolerant coleus for some bright red foliage. For great colour and texture we have papaya, tamarillo or watermelon nemesia. Bright pink, dark red or royal purple verbena also called Superbena are strong growing colourful accents that can compete with even the Supertunias. In the trailing petunia department, we have blue, violet, magenta, patio yellow, rose veined (the tags just don’t do them justice) and a dark red.
There are strawflowers for baskets, in yellow, diascia in coral, red and impressive antique rose. By popular demand, we have the white and green diamond frost euphorbia, a relative of the poinsettia. Also, we have two kinds of sun-loving lobelia, white and blue bacopa and several kinds of fuchsias.
You pick the plants and divide them into two or three layers. Save a few upright and a few trailing ones for the top. Use complimentary colours close to each other on the colour wheel or use ones on the opposite ends of the colour spectrum for that sharp contrast. Build your layer up carefully as you go. When you get to the top put one or two plants into the centre with some character (thrillers). Place some spillers around the edge to cover up the edge of the wire. Place a few more fillers in to help it look fuller faster; bacopa always works well for this.
Lastly you need to gently water the basket in. Go slow so as not to wash any of your hard work away. All baskets respond to food. You can use a water-soluble plant food every other watering or simply mix in a couple scoops of slow release basket food. Making these baskets can be quite a lot of fun. The better you feed them, the better they will look. Use the chain and hook to hang them up. They can weigh quite a bit more when fully watered, so be sure to take this into account.
Evan Davies owns Beltane Nursery at 2915 Highway 3 in Erickson.